Monday, August 31, 2015

Sweet Sunflower

I let my mother-in-law borrow my stash of dies this weekend while we were away, so I didn't have them this morning when I needed to make an anniversary card that I had forgotten about.  Can I make a card without dies??  Yep, and I really love how it turned out.  I had this image printed out for a different project but it didn't work out.  So, all I had to do was trim it to the size I wanted and color it up.  I used a stencil to create the stripes on the side.  Love that stencil!  It is actually a deep brown to match the sunflower, even though it shows up as black in the picture.

Challenges:
Time Out Challenge #38--inspiration photo (I was inspired by the stripes)

Addicted To Stamps #159--CAS
Southern Girls #167--flower power
Hiding in My Craft Room #214--Freestyle

Supplies:
Stamps: PTI "Damask Designs" sentiment; Robyn's Fetish "Sunflower1" digi
Stencil: MFT "Diagonal Stripes"

Bobble Head

Happy September!  Time for another challenge from Crafty Hazelnut's Christmas Challenge Extra.  As always, we are a month-long Anything Goes (Christmas related, of course) challenge.  Our sponsor is the fabulous Bugaboo Stamps and the winner will receive 7 images of their choice.  I chose to work with the adorable Bobble Head Christmas-Reindeer stamp.
 As soon as I saw the image, I thought it would be really fun to make his head actually bobble.  I had saved a tutorial on Pinterest on how to create your own wobble action piece.  It was really easy and makes a really fun addition to the card.  Here is a picture of the wobble action:
 It is hard to catch action in a picture, but you can see that the head really moves.
 And in this final picture, you can see the blur from the head wiggling.  So FUN!!


Challenges:
Jo's Scrap Shack #103--anything goes
Creative Knockouts #104--anything goes
Inspiration Destination #48--anything goes
Sweet Sketch Wednesday 2--sketch

ABC Christmas--Q is for Quantum Leap (A Antlers)
One Stitch At A Time #244--4 legged friends

Supplies:
Stamps: Bugaboo Stamps "Bobblehead Christmas-Reindeer" digi; Verve "Ornamental Christmas" sentiment
Dies: Spellbinders "Classic Ovals, large"; PTI "Fancy Flakes"; Verve "Flag It!"
YNS gumdrops

Blog Hop--Find the Hidden Treasure

The Love To Scrap! Challenge Blog design team is excited to bring you our "Find The Hidden Treasure" Blog Hop! We're being sponsored by Pink Gem Designs! Come hop with us for a chance to win 2 single Pink Gem Designs images!

Pink Gem Designs is based in Stourport on Severn, Worcestershire UK.

Began trading in Nov. 2008 to design cute and whimsical craft stamps in  clear polymer.
As digi products became more popular Pink Gem Designs also started to produce digital stamps
and other digital products such as downloadable papers, clip art etc..


There are three gems hidden somewhere on our blogs. As you hop, look on each design team member's blog to find a hidden gem and be sure to leave some love while you're there! Once you have found all three gems, email the locations where you found the gems (blog names and blog links) to ltscb@mail.com. All the correct guesses will be entered into the drawing for the Pink Gems Designs images!


All of the LTSCB designers are using gemstones on our inspiration projects. Everyone participating in the blog hop is invited to link up a project using gemstones for an EXTRA entry into the drawing! **Be sure to use the same email address to email the three blog names and URLs that you used to link up your project so we can make sure you're given two entries into the drawing!**

I'm a total shoe lover, so as soon as I saw this gorgeous image from Pink Gem I knew I had to use it for this hop.  It is called (fittingly): "New Shoes"; and here is the card I made with her:
Isn't she gorgeous!!??  Her dress just screamed paper piecing to me, so I went with it.  Then I pieced the bag with some silver paper to give it a high end shop look.  And just for fun, I pieced her green shoes, too, to match with her dress.This card is a bit fancier than I usually make, but I love how it turned out.  For my gems, I used pearls, rhinestones and I made my own stick pins with Swarovski crystals, rose quartz and white quartz beads.  Thanks for stopping by.
Here are your blog hop stops:


We hope you are enjoying the hop and if you get lost along the way - or if you landed here in the middle of the hop and want to join in the fun - head over to the Love To Scrap!Challenge Blog to read all the details and start from the beginning!

Challenges:
Crafty Gals #34--lots of layers
Inky Impressions #273--decoupage your image (I'm not sure exactly what decoupage is, but I do have several different layers of my image with all the paper piecing--if it doesn't count, I'm so sorry)
Word Art Wednesday #198--anything goes with uplifting sentiment

Tuesday Throwdown #259--just because
Creative Fingers #90--anything goes
Cutie Pie Challenge --cute & girly
Jo's Scrap Shack #103--anything goes
PTI SAF 2015: Pins & Needles Challenge--I made two stick pins

Supplies:
Stamps: Pink Gem Designs "New Shoes" digi; Skipping Stones Designs "Sassy Shoes" sentiment
Dies: Spellbinders "A2 Matting Basics-rectangles"; MFT "Formal Flourish" and flower die; Verve "Flag It" sentiment banner

Saturday, August 29, 2015

With Sympathy

It seems as if I have needed a lot of sympathy cards lately.  Maybe it is because I haven't been good at sending them previously and I'm just starting to make it a priority.  Whatever the reason, I have been making a bunch of them and this is one I made and sent out this week:

Challenges:
Mark's Finest Papers #277--sympathy
Hiding in My Craft Room #214--Freestyle (anything goes)
Suzy Bee's #95--make you own background
Brown Sugar #161--make the sentiment big
DRS Designs #189--feeling sentimental
Addicted To Stamps #159--CAS
Word Art Wednesday #198--anything goes with uplifting sentiment
Crafty Cardmaker's #146--no patterned paper
Crafting Musketeers #288--sketch

Creative Knockouts #69--anything goes

Supplies:
Stamps: PTI "Boutique Borders: Sympathy"; JustRite Stampers background stamp; Stamplorations "Frames and Flowers"
Dies: Spellbinders "Classic Ovals, large"

Wednesday, August 26, 2015

Fabulous Birthday

Just popping in with a quick birthday card.  Hope everyone is having a fabulous day!
 Here's the inside:

Challenges:
Craft Dee Bow-Z--anything goes with handmade bow
Cas-ual Chic #2--pretty patterns
Creative Craft Cottage #46--anything goes
Word Art Wednesday #198--anything goes with uplifting sentiment
Mod Squad--Birthday with sparkle (the silver rhinestones)
Penny's Paper #242--girly
Inspiration Destination #48--anything goes
Crafty Gals Corner #34--lots of layers
Sugar Pea Designs #19--summer sweetness (roses bloom in summer and these colors are definitely summery)
Sister Act Card Challenge #122--anything goes
Crafty Catz #207--flowers
Di's digis--ribbon/lace/twine any or all
Fussy & Fancy #146--birthdays
Viva La Verve August week 3--sketch

Sweet Stampin'--spots and/or stripes

Supplies:
Stamps: Verve "Better Together" sentiment; PTI "The Sweet Life" roses; Repeat Impressions "Beautiful Days" inside sentiment
Dies: Spellbinders "Floral Doily Motifs"; Verve "Classy Label" and "Sprightly Sprigs"; PTI "The Sweet Life"
MFT "Diagonal Stripes" stencil
PTI: Lemon Zest card stock: Lemon Zest, Sweet Blush, Berry Sorbet inks
SU! Real Red ink

Nature

Happy Wednesday!!  It's time for another challenge from The House That Stamps Built and this week we have a wonderful sketch for you to follow:
I love sketches and this one is a good one!  I turned the sketch on it's side and overlapped some of the elements, but the bones of the sketch are still there.
It's been quite a long time since I've used this technique, but I actually used markers to color on the stamp before I stamped the image.  I must have tried two or three times just using brown ink and it just wasn't working for me.  I was trying to color in the pine needles after I had stamped it and it was just looking muddled.  Then I remembered the marker on rubber; duh!  And, it was perfect!  I used the same marker and stamp to add a bit of interest to the sentiment panel.  I guess that this card could be used pretty much any time of year, but I made it to be a Christmas card.  The pine branch just makes me think of Christmas.
Head on over to The House blog and see what the rest of the DT has done with this sketch.  Let me tell you, they are all different.  Then get inky and play along.  I'd love to see how this one inspires  you.  And don't forget the 10% off your entire order code over on my left sidebar.

Challenges:
Crafty Hazelnut's Patterned Paper--anything goes with patterned paper
Craft Dee Bow-Z--anything goes with handmade bow
ABC Christmas--Q is for quantum leap (I chose to use D is for die cuts)
Sister Act Card Challenge #126--anything goes
Di's digis--ribbon/lace/twine/ or all
Creative Fingers #92--anything goes
Hiding in my craft room #213--any holiday (Christmas)
Sweet Stampin--spots and/or stripes
Christmas Card Challenge #38--anything goes

Supplies:
Stamps: Repeat Impressions "2708W Pine Branch" and "4009W In All Things . . ."
Dies: Spellbinders "A2 Filigree Delight" and "A2 Matting Basics" rectangle
Ribbon from Really Reasonable Ribbon

Friday, August 21, 2015

Who's three?

My niece is turning 3 next week and I wanted to make her a fun card.  And what is more fun than a pop-up box card?!  

 Here's what it looks like when it is folded up ready to go into the envelope:
 And here is the back, where the birthday wishes will go.

Challenges:
As You See It #100--celebrate
Crafter's Cafe #130--shaped card
MFT #242--sketch (the front panel of the card is based on the sketch)

Creative Knockouts #103--celebration
Scor-pal #18--more than one score: birthday celebrations
Verve Diva Inspirations Challenge--Celebrate
The Cutie Pie Challenge--cute & girly
Die Cuttin' Divas #229--celebrate it!

Supplies:
Stamps: PTI "Big Birthday Wishes" front sentiment; MFT "Delicious Birthday" back sentiment; Wild Rose Studio elephant image
Dies: PTI "By The Numbers" large 3's and Numbers Border die small 3's; MFT "Blueprints 13" front banner; Verve "Pennant Trim" die

Wednesday, August 19, 2015

Happy Hello

Happy Wednesday!  It's time for another challenge from The House That Stamps Built.  This week, we have a beautiful inspiration photo for you:
Don't you just love those colors?!  Here's my take on it:
The background was created using Sharpie Markers and rubbing alcohol.  Seriously, it was that easy.  I followed this tutorial that I found on Pinterest.  After creating the background and stamping the butterflies, I spritzed on some Glimmer Mist to give it a really pretty sparkle, but it's really hard to catch it in a photo.

Ooo . . . yeah . . . see those pink stripes on the bottom of my sentiment panel?  I created that with my newest favorite tool: a stencil.  I'm so in love! Head on over to The House blog and check out how the rest of the DT interpreted this challenge.  And if you see a stamp you have to have, make sure you use the 10% off discount code on the left hand side of my blog (It's off your entire order!)

Challenges:
One Sweet Challenge--back to school; use a new technique or medium (I've never used this sharpie technique before)
Pattie's Creations #113--anything goes
The Paper Nest Dolls #8--anything goes
Through The Purple Haze--flowers
Vintage Stamping Challenge #35--anything goes
Viva La Verve August week 1--sketch (I used a bit of vellum for the layer under to tag layer; I didn't want to cover up that beautiful background, but did want to add some softness)

Fab n' Funky Challenge #270--things with wings
Sister Act Card Challenge #119--anything goes
Hiding in My Craft Room #212d--use die cuts

Supplies:
Stamps: Repeat Impressions "9001 Butterfly (lg)" and "9717 Happy Hello"
Dies: PTI "Tag Sale #8" and flower die; Verve "Flag It!"; MFT "Fancy Flourish"
MFT "Diagonal Stripes" stencil

Monday, August 17, 2015

Nature Fairy

It's time for another challenge from The Love To Scrap Challenge Blog.  Last challenge seemed a bit hard for everyone, but this time it is super easy: Anything Goes!  We have three wonderful sponsors:
(prize is 3 images)

(prize is 3 images)

(prize is $10 gift certificate)

I wasn't really familiar with SLS Lines before, but they have some gorgeous images!  I was given this beautiful "Nature Fairy" to work with.  Sooooo beautiful.  The flowers reminded me of chrysanthamums which made me think of Fall.  I'm not trying to hurry along summer, but I just had to go with that Fall theme.
Now, head on over to the LTSCB blog to get the full details of the challenge and to check out what the rest of the DT has been up to.

Challenges:
Hiding in my Craft Room #212d--use die cuts
A Gem of a Challenge #151--One for the GIRLS
Aud Sentiments #138--Fairies
As You Like it--favorite 2 embellishments and why (ribbon and pearls are my favorites; ribbon is a great way to add texture and extra color and pearls are just so pretty.  Both can be used on so many different styles of cards.  Just love them!)
DRS Designs #187--You left me hanging (my tag and charm)
The Paper Shelter #214--lace and/or ribbon
Sweet Sketch Wednesday 2--sketch

Fab n Funky #270--things with wings
Crafter's Cafe #129--the great outdoors
Clear It Out--theme: brown; stash: brown/kraft embellishments
Top Tip Tuesday--ribbon & pearls
Aurora Wings #17--anything with wings

Supplies:
Stamps: SLS Lines "Nature Fairy" digi; Flourishes "Charmed" sentiment
Dies: Spellbinders "Fleur Di Lis Squares" and "Scalloped Tags"
Ribbon is from Really Reasonable Ribbon
Charm and corner piece are from Miriam's Crafting Supplies

Sunday, August 16, 2015

90th birthday!

Not many people live until their 90th birthday, but today we celebrated my husband's grandfather's 90th!  For me, masculine cards are more difficult and add to that an older male and phew, it's really tricky!  But I had seen a few cards around on pinterest using this clock face die from PTI, and I loved the look of them and knew that was the idea I was going with.  When I saw this sketch by Viva La Verve and it was a perfect fit.  I love how this turned out.  Masculine (even with sequins!), very layered and quite sophisticated, I think.
To create the diagonal stripes, I used a stencil that I had just gotten and sponged on some black ink.  It's really the first time I have used a stencil, and I'm pretty sure I'm in love! : )  Now I can have stripes in ANY color.  Yippie!

Challenges:
Inspiration Destination #46--anything goes
Penny's Paper #240--anything goes
Addicted to Stamps #157--make your mark
Crafting by Designs--3+ layers
Word Art Wednesday #196--anything goes with uplifting sentiment
Hiding in my Craft Room #212c--Happy Birthday
As You See It #100--celebrate
Viva La Verve August week 2--sketch

Sister Act Card Challenge #119--anything goes
Kraftin' Kimmie Stamps Wonderful Wednesday--anything goes
Little Miss Muffet #118--anything goes
Art Impressions #166--anything goes
Verve Diva Inspiration Challenge--celebrate
Cas-ual Chic Challenge #2--pretty patterns
One Sweet Challenge--back to school; use a new technique or medium (first time really using a stencil to create a pattern)
Come And Get It--round things (my clock face and sequins)

Supplies:
Stamps: PTI "Hands of Time"; JustRite Stampers "Crackle Backgroun"
Dies: Verve "Classy Label"; PTI "Hands of Time", "By the Numbers" and "Sparkle and Shine: Sequins"
Stencil: MFT "Diagonal Stripes"


Friday, August 14, 2015

Shine

Can you believe that it is the middle of August already!?  Since it is, that means it is time for our mid-month inspiration post on the Crafty Hazelnut's Christmas Challenge Extra blog.  If you haven't been playing along, there is still plenty of time.  Anything Goes as long as it is Christmas related.  Here is my inspiration for you:
 I just love shaker cards, don't you?  They're so fun!  This next pic shows the shaker in action.

Challenges:
Crafty Gals #32--any holiday
Addicted to Stamps #157--make your mark (ink)
MFT #241--sketch

Word Art Wednesday #196--anything goes with uplifting sentiment
Tuesday Throwdown #257--favorite occasions (definitely Christmas for me!)
Crafting with an Attitude--anything goes
Sparkles Christmas Challenge #55--no patterned paper
Christmas Cards All Year 'Round--snowflakes
Southern Girls Challenge--shiny, blingy, happy things
Mod Squad--heat emboss

Supplies:
Stamps: PTI "Sparkle and Shine Holiday"; Hero Arts musical background
Dies: PTI "Fancy Flakes" large snowflakes and "Sequins"; Sweet n' Sassy snowflake dies (3 smaller snowflakes); MFT "Blueprints 13" stitched rectangle; Spellbinders "Standard Circles, large"
PTI "Aqua Mist" card stock and "Aqua Mist" and "Ocean Tides" ink

Wednesday, August 12, 2015

Summer

It's Wednesday again and that means it's time for another What If? Wednesday challenge from The House That Stamps Built.  This week it is Sun, Sand, and Surf.  Fun, right?
Here is my summery card:
 I started our with Repeat Impressions' "9016W. Sandcastle", then stamped "4109W Sand Dollar" on the background piece to give it some subtle pattern.  Check out those letters!!  I'm just in love with how they turned out.  Here's a close up:
I colored a strip of scrap white card stock with a brown Spectrum Noir marker, then swiped some aqua mist ink directly from the ink pad below the brown.  I sponged on a bit of medium blue to tone down the aqua and add "waves" with a darker blue marker and a white gel pen.  Then I taped my letter dies in place and die cut them from the strip.  I also die cut the letters from white card stock 3 times and layered all four sets together to create some depth.  Did I mention that I love how it turned out?  It's so fun.  
Head on over to the House blog and see how the rest of the DT interpreted this challenge.  Their cards are pretty fabulous!

Challenges:
Cards Galore--anything goes
Pattie's Creations #113--anything goes
Crafty Calendar Challenge--bingo (I went with the center row: die cuts, kraft, blue)
Craftin' Desert Divas--keeping cool
Paper Girls #85--Large letters
I used the sketch from Hanna & Friends and then realized I didn't have a "living creature" on the card which is part of the rules, bummer!
Frosted Designs--metal/metallics (metal star brads)
Brown Sugar #158--anything goes
Fussy & Fancy #145--Lazy Summer Days
Jo's Scrap Shack #100--anything goes
Creative Fingers #89--anything goes
Wags n' Whiskers #160--Frame it out
Sweet Stampin'--anything BUT a birthday card
Eureka Stamps #153--Hot, hot, hot!
Sweet Stamps #234--Anything goes
Crafty Cardmakers #145--warm summer colors
Fashionable Stamping #102--seaside or beach

Supplies:
Stamps: Repeat Impressions "9016W Sandcastle" and "4109W Sand Dollar"
Dies: Spellbinders "Classic Circles, large"; PTI lowercase letters; MFT sunshine
PTI: Aqua Mist card stock, ink and grossgrain ribbon

Monday, August 10, 2015

Project of the Week

At the beginning of July, I joined the Repeat Impressions Rock Star Team and I've been having a blast.  Each Monday, the Rock Stars take turns sharing a project of the week on the Repeat Impressions blog: The House That Stamps Built.  This week, it just happens to be my turn.  I'm a bit nervous as it is my very first one, so please be understanding, okay? I'm going to show you how to use frantage (the chunky embossing powder that you see all over in the card making world right now) with a mini tutorial on using a stamp-a-ma-jig.  I just learned how to use frantage the right way and I'm super excited.  Here is what the finished card looks like:
Ready?  Let's go.  Here are the items you will need to create this card:
1 Piece of white card stock 4.25 x 11 inches scored at 5.5 inches on the long side
1 Piece of kraft card stock 4.25 x 5.5 inches (my kraft is too flimsy for a card base, so I will attach it to the white card stock base)
1 Piece of white card stock 4 x 5.25 inches
Aqua Mist ink (Papertrey Ink) and an ink dauber
Versamark ink
Black ink (which I forgot to add in the picture above)
Stamp-a-ma-jig
Stampendous Frantage Embossing Powder (I used Shabby White)
Regular gold embossing powder
Heat Tool
Score tape
Repeat Impressions stamps "4109 Sand Dollar" and "2407 Life's a Beach"

I started out by using my ink dauber to ink the edges of my 4 x 5.25 inch piece of white card stock with aqua mist ink.  If you look really closely, you can see that I used a pencil to lightly trace my sand dollar stamp onto the panel so I would have an idea where I wanted to stamp the image.
Then I used my Stamp-a-ma-jig to get the proper alignment.  I forgot to take a picture of the very first step (arghh), but I do have the first step later on with the sentiment.  Line up the acetate piece in the corner of the tool, ink up your stamp and line up your mounted stamp right in that same corner and stamp.  You can see how my black image is in the upper left corner.  I used black so I would be able to see it against the white card stock. 

Place the image on the acetate in the spot you want the image to be on your card.  Then nestle the tool right onto the corner of the acetate.
 Remove the acetate while keeping the tool in the same position and line your stamp (black ink cleaned off and the stamp re-inked with versamark) up in the corner of the tool and stamp.
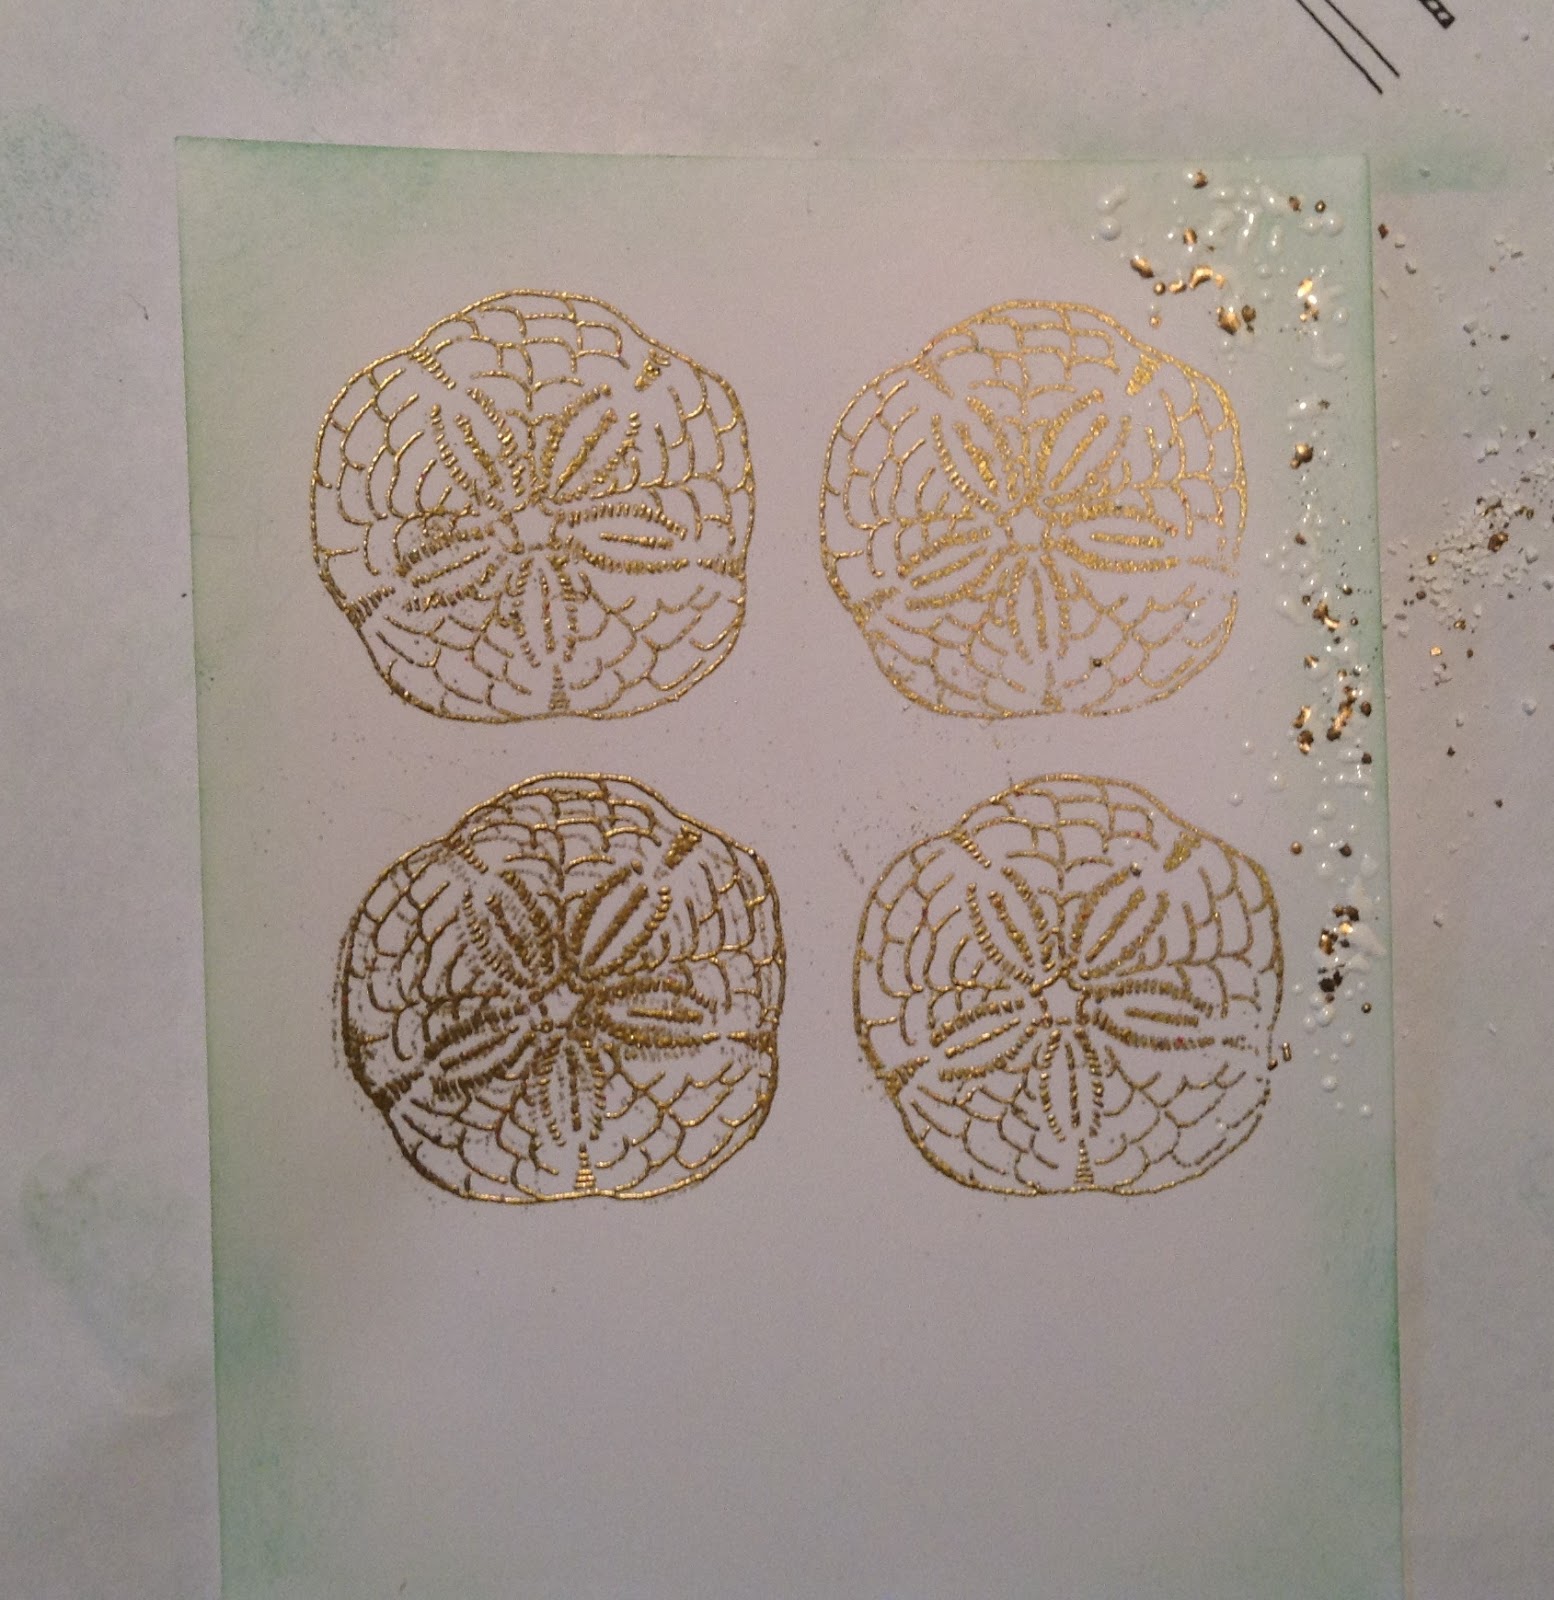
 After I had stamped all four of the sand dollars I covered them with gold embossing powder.
 And embossed them with my heat tool.  All nice and shiny.
 Now the fun part!  Working on a small section at a time, sprinkle on the frantage powder.  I use a small paintbrush to sweep stray pieces.  Turn on your heat tool and (this is the KEY!!) heat the powder from UNDER the card stock.  If you try to do it from the top like normal embossing powder, it will blow all over the place and not a single piece will stay on the card stock.  I know, I've done it.  But if you do it from underneath, the powder barely moves.
 Here it is nice and melted: 
 Continue on in this way until you have gone all the way around.  This picture shows my panel all embossed except the last section.
 Once that is finished, it's time to stamp the sentiment.  Here is the promised picture of the first step for using the Stamp-a-ma-jig.  The acetate is lined up in the corner of the tool and the mounted stamp has also be lined up and stamped.
 Place the sentiment on the acetate in the position you want it on the panel and line up the tool.
 Remove the acetate while keeping the tool in place and nestle the stamp in and stamp.
 My card stock warped a bit due to the embossing, so I used a lot of score tape to adhere it to the kraft panel.

 It needed a little something else, so I add a tiny pearl on either end of the sentiment to draw attention to it.
 Here's a close-up of all the frantage goodness:
Thanks so much for stopping by and checking out my Project of the Week.  I hope it was helpful.

Challenges:
Sister Act Card Challenge #112--anything goes
V's Sweet Ideas #37--anything goes
{Pin}spirational Challenge #146--inspiration photo (I was inspired by the beach theme)
https://www.pinterest.com/pin/141581982005984747/
MFT #240--sketch

Addicted To Stamps #156--anything goes
Inspiration Destination #45--anything goes
Raisin Boat #36--summertime
Frosted Designs--metal/metallics (I used gold embossing powder)
Brown Sugar Challenge #158--anything goes
Sister Act Card Challenge #118--anything goes
Jo's Scrap Shack #100--anything goes
Creative Fingers Challenge #89--anything goes